
Web Scraping with Python 101
Learn to build a web scraper with Python using Requests and BeautifulSoup libraries. We will cover, step-by-step, a scraping process on a job board.


Table of contents
- Prerequisites
- Video Tutorial
- What is Web Scraping
- Web Scraping Process Summarized
- Basic Structure of a Web Page
- How to Obtain HTML using Requests
- Parsing Data with BeautifulSoup
- Step 1: Explore Target with DevTools
- Step 2: Obtain HTML with Requests
- Step 3: Extract Data with BeautifulSoup
- Step 4: Convert and Store Data with Pandas
- Next Steps
- Conclusion
The Internet is a vast data source if you know where to look - and how to extract it! Going page by page and copying the data manually is not an option anymore. And yet, many people still are doing that.
It would be great if our favorite data source were to expose all of it in a convenient format such as CSV. We wish it were so.
What if we told you that there is a solution? We are talking about Website Scraping. It allows you to extract structured information from any source available on the Internet. You can choose the data you will get and how to store it. And it is repeatable, meaning that you can run the same script every day - hour, or whatever- to get new items.
Continue with us to learn how to code your own web scraper taking a job board as an example target. We will build step-by-step a web scraping project with Python.
Curious? Let's dive in! 🤿
Prerequisites
For the code to work, you will need python3 installed. Some systems have it pre-installed. After that, install all the necessary libraries by running pip install.
pip install requests beautifulsoup4 pandas
Video Tutorial
If you prefer video content, watch this video from our Youtube channel.
What is Web Scraping
Web scraping consists of extracting data from websites. We could do it manually, but scraping generally refers to the automated way: software - usually called bot or crawler - visits web pages and gets the content we are after.
The easier way to access data is via API (Application Programming Interface). The downside is that not many sites offer it or allow limited access. For those sites without API, extracting data directly from the content - scraping - is a viable solution.
As we'll see later, many websites have countermeasures in place to avoid massive scraping. Do not worry for the moment; it should work for a few requests.
Web Scraping Process Summarized
The most famous crawlers are search engines, like Google, which visit and index almost the whole Internet. We'd better start small, so we'll begin from the basics and build upon that. These are the four main parts that form website scraping:
- Inspect the Target Site Get a general idea of what data you can extract and how the page organizes it.
- Obtain the HTML Access the content by downloading the page's HTML. We will focus on static content for simplicity.
- Extract data Obtain the information you are after, usually a piece of data or a list of repeated items (i.e., a job offer or job listings).
- Store extracted data Once extracted, transform and store the data for its use (i.e., save to a CSV file or insert in a database).
Basic Structure of a Web Page
Let's zoom out for a second and go back to the fundamentals - sorry, a bit of theory is coming. You can skip the following two sections if you are already familiar with the basics.
A web page consists mainly of HTML, CSS, Javascript (JS), and images. Bear with us for a second if you don't understand parts of that sentence.
A browser, like Chrome, opens a connection via the Internet to your favorite website using the HTTP protocol. The most common request type is GET, which usually retrieves information without modifying it. Then the server processes it and sends back an HTML (HyperText Markup Language) response. Simplifying, HTML is a text file with a syntax that will tell the browser what content to paint, text to show, and what resources to download.
In those extra resources are the ones mentioned above:
- CSS will format and style the content (i.e., colors, fonts, and many more).
- Javascript adds functionality and behavior, such as loading more job offers on infinite scroll.
- Images... well, you get the point. They can be used as part of the main content or as backgrounds.
The browser will handle all the requests/responses and render the final content. Everything shows the style defined by the CSS file. Thanks to the behavior in the JS files, the infinite scroll works perfectly. Images are loaded and displayed where they should. The browser is really doing a lot of work, but usually so fast that we don't even notice as users.
However, the critical part for web scraping is the initial HTML. Some pages will load content later, but we will focus - for clarity - on those that load everything initially. That difference is usually called static vs. dynamic pages.
If your case involves dynamic pages, you can go to our article on scraping with Selenium, a headless browser. In short, it launches a real browser to access the target webpage. But it is programmatically controlled, so you can extract the content you desire.
What is HTML
HTML "is the standard markup language for documents designed to be displayed in a web browser." It will structure the page using tags, each one meaning something different to the browser. For example, <strong> will show text in bold, and <i> will do so in italics.
Other components will control what can be done and not the display format. Examples of that are <form> and <input>, which allow us to fill and send forms to the server, such as logging in and registering.
HTML elements might have attributes such as class or id, which are name-value pairs, separated by =. They are optional but quite common, especially classes. CSS uses them for styling and Javascript for adding interactivity. Some of them are directly associated with a tag, like href with <a> - URL of the link tag.
An example: <a id="example" class="link-style" href="http://example.org/">Go to example.org</a>
- The tag
<a>tells us that it is a link. id="example"gives the element a unique ID. Browsers also use this for internal navigation as anchors.- The CSS processor will interpret
class="link-style", and it might show in a different color if so defined in the CSS file. href="http://example.org/"is the link's destination in case the user clicks the element.Go to example.orgis the text that the browser will show. Depending on the browser and CSS file, it might have some default style like a blue color or underline.
How to Obtain HTML using Requests
Now that we've seen the basics, let's use Python and the Requests library to download a page.
We will start by importing the library and defining a variable with the URL we want to access. Then, use the get function to obtain the page and print the response. It will be an object with the response's data: the HTML and other essential pieces such as status code.
import requests

url = "http://example.org/"
response = requests.get(url)
print(response) # <Response [200]>
print(response.status_code) # 200
print(response.text) # <!doctype html>...
We won't go into further detail on status codes, which indicate whether the request was successful. The ones in the 200 - 299 range mean success (sometimes denoted 2XX), 3XX indicates a redirection, 4XX client error, and 5XX server error. Don't worry, the responses should be 200 in our tests, and you will learn later what to do otherwise.
Parsing Data with BeautifulSoup
As seen in the response's text above, the data is there, but it is not easy to obtain the interesting bits. It is prepared to be consumed by a browser, not a human! To make it accessible, we will use BeautifulSoup, "a Python library for pulling data out of HTML."
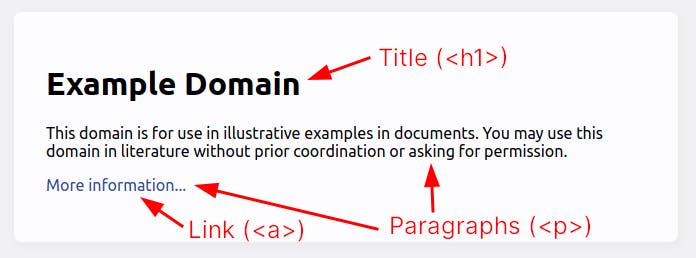
It will allow us to get the data we want using the classes and IDs mentioned above. Following the example in the previous section, we will access the title (<h1>) and the link (<a>). We'll see how we know what tags to look for in a moment.
from bs4 import BeautifulSoup

soup = BeautifulSoup(response.text, "html.parser")

title = soup.find("h1")
print(title.text) # Example Domain

link = soup.find("a")
print(link.text) # More information...
What happens if we want to access several items? There are two paragraphs (<p>) in the example, but the find function would only get the first one. find_all will do precisely that, returning a list (ResultSet) instead of an element.
paragraphs = soup.find_all("p")
print(len(p)) # 2

print([p.text for p in paragraphs])
# ['This domain ...', 'More information...']
But we can access more than just text. For example, the link's target URL is in the element's href property, accessible with the get function.
print(link.get("href")) # https://www.iana.org/domains/example
So far, so good. But this is a simple example, and we accessed all the items by the tags. What about a more complex page with tens of different tags? We will probably need classes, IDs, and a new concept: nesting.
We will build a functional web scraper with an example site in the following sections. For now, a quick guide on the fundamental selectors:
soup.find("div")will get the first element that matches thedivtag.soup.find(id="header")looks for a node which ID isheader. IDs are unique, so there shouldn't be more items with the same one.soup.find(class_="my-class")returns the first item that contains themy-classclass. Nodes can have multiple classes separated with spaces.soup.find("div").find(id="header").find(class_="my-class")As you can see, it might get complicated fast. The example gets the firstdiv, finds theheaderby ID, and an item withmy-classinside that. It is called nesting and is common in HTML, where almost all items are nested inside a parent tag.
Now that we've got the basics, we can move on to the fun part.
Step 1: Explore Target with DevTools
Hold your horses 🐎! We know that coding is the fun part, but first, you'll need some understanding of the page you're trying to scrape. And not just the content but also the structure. We suggest browsing the target site for a few minutes with DevTools open (or any other tool).
For the rest of the examples, we will use remotive.io to demonstrate what can be done. Its homepage contains lists of job offers. We'll go step-by-step, getting the data available and structuring it.
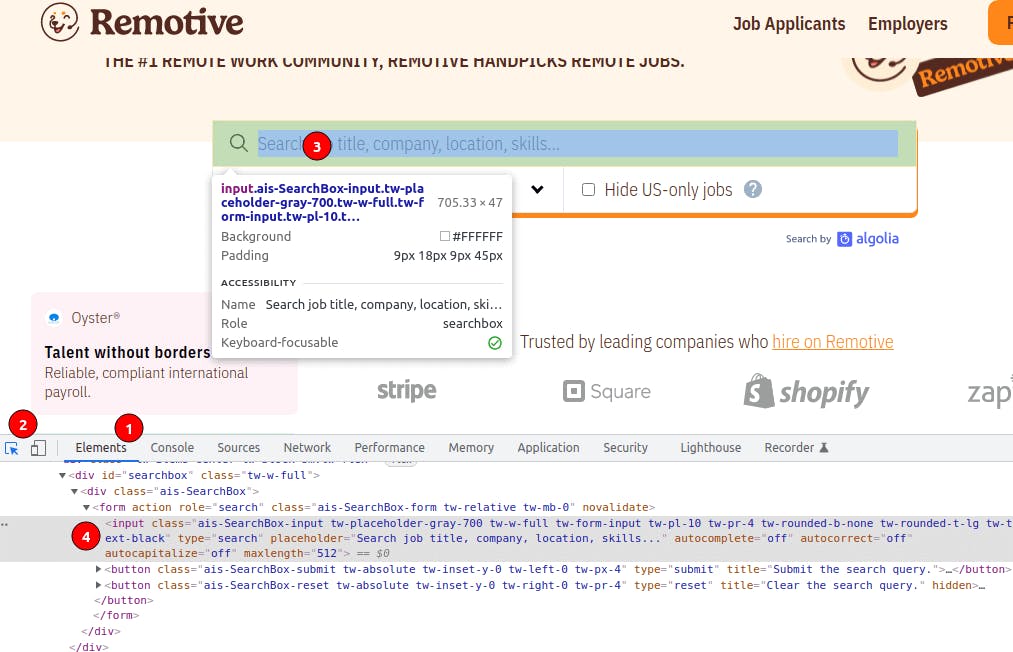
To start exploring, go to the page on a new tab and open DevTolls. You can do it by pressing Control+Shift+I (Windows/Linux), Command+Option+I (Mac), or Right-click ➡ Inspect. Now go to the Elements tab [#1 on the image below], which will show the page's HTML. To inspect an element on the page, click on the select icon (to the left) [#2], and it will allow you to pick an item using the mouse [#3]. It will be highlighted and expanded on the Network tab [#4].
Once familiarized with DevTools, take a look, click elements, inspect the HTML, and understand how classes are used. Discover as much as possible and identify the essential parts (hint: look for the job entries with the class job-tile). We picked a well-structured site with classes that reflect the content, but it is not always the case.

Then explore also other page types, such as category or job offer. Maybe some details are essential to you but only available on the offer page. That would change the way to approach the coding. Or you realize that, as is the case, the structure for the category pages (i.e., Software Development) is the same as the homepage. That means we could scrape all the category pages for a bigger offer list! We won't do that for now, but we could do it.
Spoiler: it is not precisely the same since category pages are dynamically rendered. As mentioned above, headless browsers are needed for those cases.
Step 2: Obtain HTML with Requests
The first part of the code is the same as with example.org. Get the content using requests.get.
import requests

url = "https://remotive.io/"
response = requests.get(url)
print(response.status_code) # 200
print(response.text) # <!DOCTYPE html>
As mentioned earlier, many sites have anti-scraping software. The most basic action is blocking an IP with too many requests. Adding proxies to requests is simple, and they will hide your IP. This way, in case of being banned, your home/office address would be unaffected. But even better, some proxies add rotating power, which means that they assign a new IP to every request. That makes the banning part much more complicated, giving you room to scrape with fewer restrictions.
Tagging IPs is just the most common measure, but they might implement many more such as checking headers or geolocation. But for most sites, this approach should work fine.
import requests

url = "https://remotive.io/"
proxies={'https': 'http://api_key:@proxy.zenrows.com:8001'}
response = requests.get(url, proxies=proxies, verify=False)
print(response.text) # <!DOCTYPE html>
We are fetching just one URL, which is fine to begin. But it gets more complicated when trying to scrape at scale, so we will keep it sequential and straightforward at this point.
This step might look like the easiest one at first since requests handles it for us. But we mention the complications for you to be aware of 😅
Step 3: Extract Data with BeautifulSoup
This step is the one that changes most from case to case. Since it decides what data you will extract, it varies for each page type you want. For example, the selectors for the offer page won't work for the homepage. And suppose anything changes on the page (new fields, design change). In that case, you will probably need to modify the scraper to reflect those changes.
Following the job board example, the first thing we want to access is the job offer wrapper using ID (id="initial_job_list"), a job offer, and its title using class (class_="job-tile"). Note that it is "class_" and not "class" since it is a reserved word in Python.
import requests
from bs4 import BeautifulSoup

url = "https://remotive.io/"
response = requests.get(url)
soup = BeautifulSoup(response.text, "html.parser")

jobs_wrapper = soup.find(id="initial_job_list")
job = jobs_wrapper.find(class_="job-tile")
job_title = job.find(class_="job-tile-title")
print(job_title.text) # Senior Front-End Engineer
See how we use the variable created in the previous line instead of soup? That means that the lookup will take place in the element - i.e., jobs_wrapper - and not the whole page. This is an example of the previously mentioned nesting but storing them in variables instead of concatenation.
There is a slight problem there, right? We only got ONE job offer! We need to change jobs_wrapper.find for jobs_wrapper.find_all to get all the job offers and then extract the data we want for each one. We will move that logic to a function to separate concerns.
#...
def extract_data(job):
    job_title = job.find(class_="job-tile-title")
    extra = job.find("p").text.split("·")
    return {
        "id": job.parent.get("id"),
        "title": job_title.text.strip(),
        "link": job_title.get("href"),
        "company": extra[0].strip(),
        "location": extra[1].strip(),
        "category": job.find(class_="remotive-tag-transparent").text,
    }

jobs_wrapper = soup.find(id="initial_job_list")
jobs = jobs_wrapper.find_all(class_="job-tile")
results = [extract_data(job) for job in jobs]

print(results)

# [
#   {
#     "id": "971825-software-dev",
#     "title": "Senior Front-End Engineer (JS/Graphics/3D)",
#     "link": "/remote-jobs/software-dev/senior-front-end-engineer-js-graphics-3d-971825",
#     "company": "Spline",
#     "location": "Remote (Anywhere)",
#     "category": "Software Development"
#   },
#   ...
# ]
BeautifulSoup also offers the select function, which takes a CSS selector and returns an array of matching elements.
jobs = jobs_wrapper.select(".job-tile")
For more ideas, check out our article on tricks when scraping. We explain that you can get relevant data from different sources such as hidden inputs, tables, or metadata. The selectors used here are very useful, but there are many alternatives.
And the same idea applies to extracting data, although we already moved it to the extract_data function. This way, if we were to change any selector because the paged changed, we would locate it quickly.
Step 4: Convert and Store Data with Pandas
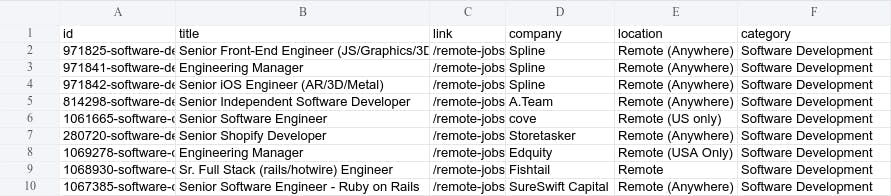
We can read and operate with the extracted data. But for future analysis and usage, it is better to store it. In a real-world project, a database is usually the chosen option. We will save it in a CSV file for the demo.
Since CSV files and formats are beyond this tutorial, we will use the pandas library. The first thing is to create a DataFrame from the data we got. It accepts dictionaries usually without problems. Then, we call the helpful to_csv function to convert the dataframe to CSV and save it in a file.
import pandas as pd
# ...
data = pd.DataFrame(results)
data.to_csv("offers.csv", index=False)
As with any piece of software, we should follow good development practices. Single responsibility is one of them, and we should separate each of the steps above for maintainability. Storing CSV files is probably not a good option long-term. And, when the moment comes, it will be easier to replace if that part is separated from the extraction logic.
And the same idea applies to extracting data, although we already moved it to the extract_data function. This way, if we were to change any selector because the paged changed, we would locate it quickly.
Next Steps
Celebrate now! You built your first scraper. 🎉
Error Handling
We said earlier that you should not worry about the error codes for the tutorial. But for a real-world project, there are a few things that your should consider adding:
- Check
response.ok. The library comes with a boolean that tells us if it went correctly. - Error handling for the critical parts (
try/except). - Retry requests in case of error.
import requests
from bs4 import BeautifulSoup

url = "https://remotive.io/"
try:
    response = requests.get(url)
    if response.ok:
        # ...
    else:
        print(response) # status_code is 4XX or 5XX
except Exception as e:
    print(e)
Scaling Up
The following steps would be to scale the scrapers and automatize running them. We won't go deep into these topics, just a quick overview.
Following the example, two main things come to mind: scraping category pages instead of the homepage and getting more data from the job offer detail page. Depending on the intention behind the scraping, one might have more sense than the other.
We'll take the second one, scraping further details from each offer. We have already extracted the links in the previous steps to get them. We have to loop over them, get the link, and request the URL. Prepend the domain since it is a relative path. We simplified the data extraction part for brevity. The point is the same as above, extract the data you need using selectors.
Be careful when running the code below. We added a "trick" to slice the array and get only two job offer details. The idea is to avoid a hundred requests to the same host in seconds and make it faster.
results = results[:2] # trick to avoid a hundred requests

job_details = []
for job in results:
    response = requests.get("https://remotive.io" + job["link"])
    soup = BeautifulSoup(response.text, "html.parser")

    job_title = soup.find("h1")
    job_desc = soup.find(class_="job-description")
    job_meta = soup.find(id="job-meta-data")
    job_details.append({
        "title": job_title.text,
        # ...
    })

print(job_details)

# [
#     {
#         'title': 'Senior Front-End Engineer (JS/Graphics/3D)'
#     }, {
#         'title': 'Engineering Manager'
#     }, ...
# ]
Other Countermeasures
Many other problems appear when scraping, one of the most common being blocks. For privacy or security, some sites will not allow access to users that requests too many pages. Or will show captchas to ensure that they are real users.
We can take many actions to avoid blocks. Still, as mentioned earlier, the most effective one is using smart proxies that will change your IP in every request. If you are interested or have any problems, check out our article on avoiding detection.
Conclusion
We'd like you to part with the four main steps:
- Explore the target site before coding
- Retrieve the content (HTML)
- Extract the data you need with selectors
- Transform and store it for its use
If you leave with those points clear, we'll be more than happy 🥳
Web scraping with Python, or any other language/tool, is a long road. Try not to feel overwhelmed by the immensity of resources available. Scraping Instagram on your first day will probably not be possible since they are well-known blockers. Start with an easier target and gain some confidence.
Feel free to ask any follow-up questions or contact us.
Thanks for reading! Did you find the content helpful? Please, spread the word and share it. 👈
Originally published at https://www.zenrows.com