Web Scraping with Javascript and Node.js
How to build a website scraper with anti-blocking features and parallel requests
Javascript and web scraping are both on the rise. We will combine them to build a simple scraper and crawler from scratch using Javascript in Node.js.
Avoiding blocks is an essential part of website scraping, so we will also add some features to help in that regard. And finally, parallelize the tasks to go faster thanks to Node's event loop.
Prerequisites
For the code to work, you will need Node (or nvm) and npm installed. Some systems have it pre-installed. After that, install all the necessary libraries by running npm install.
npm install axios cheerio playwright
Introduction
We are using Node v12, but you can always check the compatibility of each feature.
Axios is a "promise based HTTP client" that we will use to get the HTML from a URL. It allows several options such as headers and proxies, which we will cover later. If you use TypeScript, they "include TypeScript definitions and a type guard for Axios errors."
Cheerio is a "fast, flexible & lean implementation of core jQuery." It lets us find nodes with selectors, get text or attributes, and many other things. We will pass the HTML to cheerio and then query it as we would in a browser environment.
Playwright "is a Node.js library to automate Chromium, Firefox and WebKit with a single API." When Axios is not enough, we will get the HTML using a headless browser to execute Javascript and wait for the async content to load.
Scraping the Basics
The first thing we need is the HTML. We installed Axios for that, and its usage is straightforward. We'll use scrapeme.live as an example, a fake website prepared for scraping.
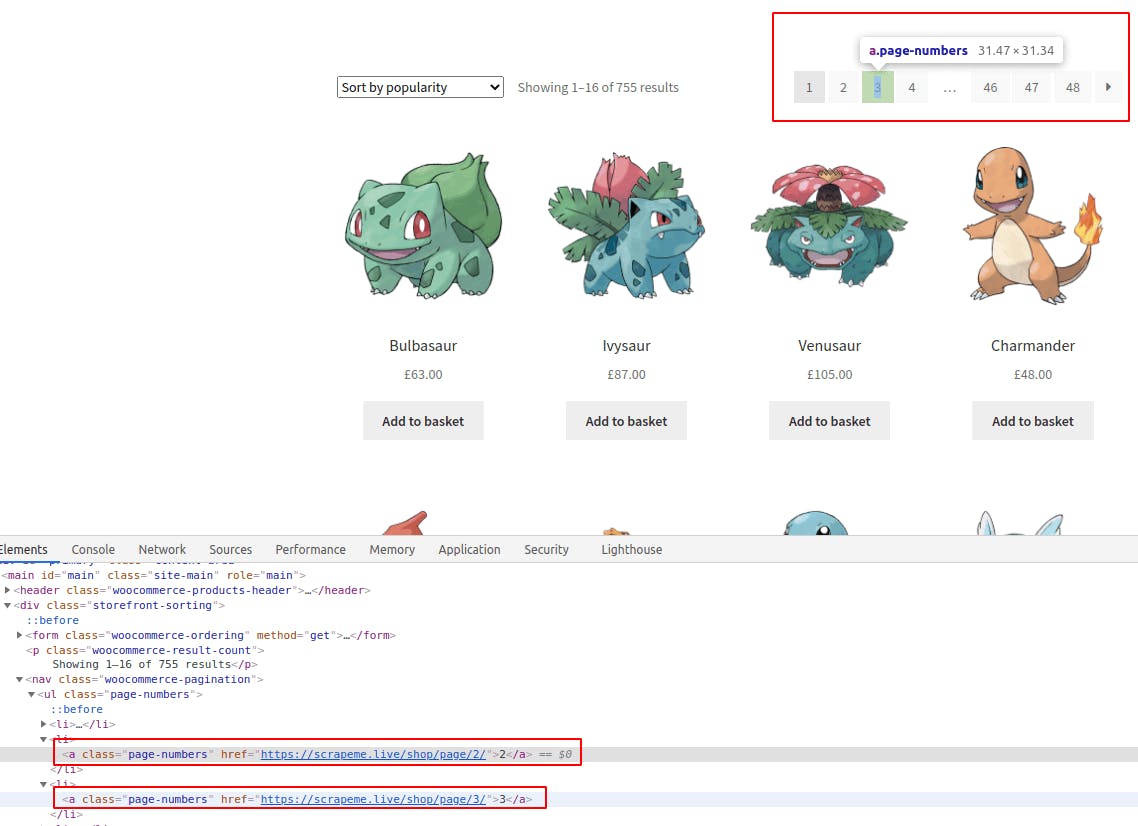
Nice! Then, using cheerio, we can query for the two things we want right now: paginator links and products. To know how to do that, we will look at the page with Chrome DevTools open. All modern browsers offer developer tools such as these. Pick your favorite.

We marked the interesting parts in red, but you can go on your own and try it yourselves. In this case, all the CSS selectors are straightforward and do not need nesting. Check the guide if you are looking for a different outcome or cannot select it. You can also use DevTools to get the selector.

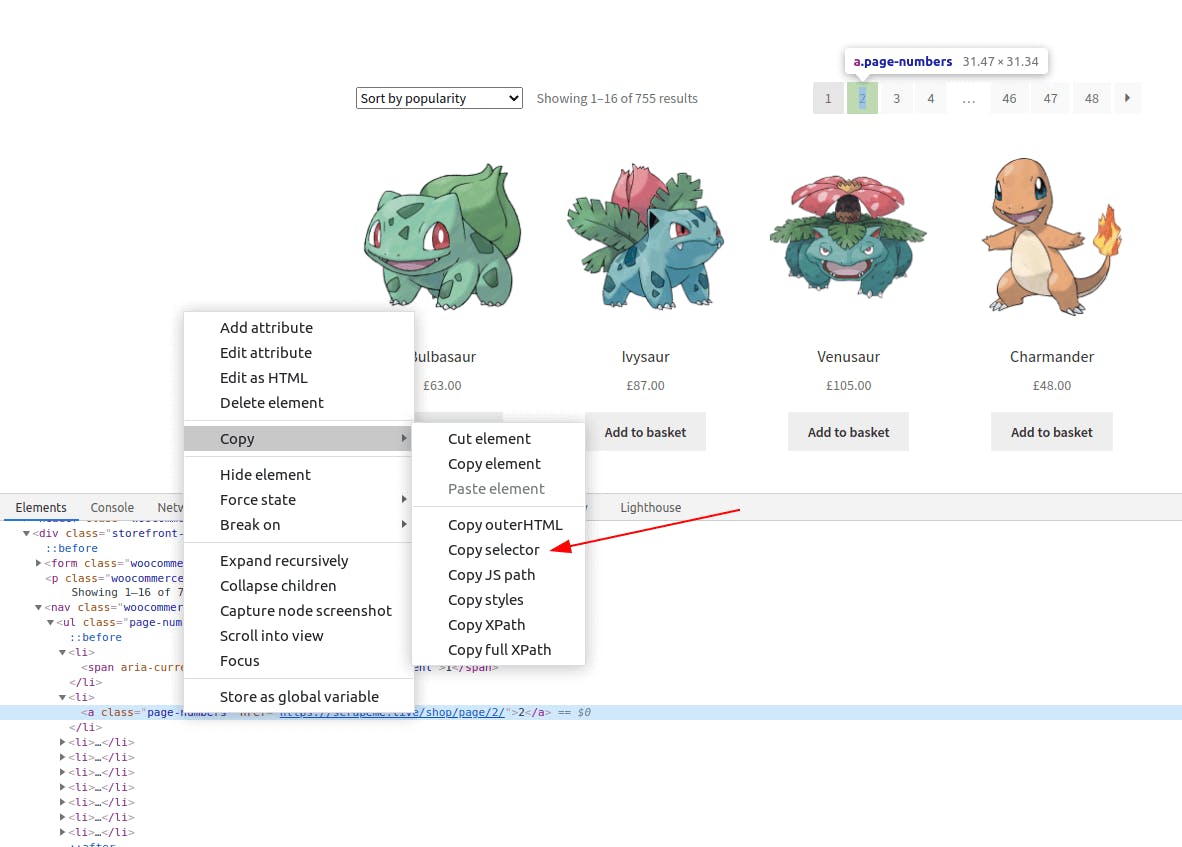
On the Elements tab, right-click on the node ➡ Copy ➡ Copy selector.
But the outcome is usually very coupled to the HTML, as in this case: #main > div:nth-child(2) > nav > ul > li:nth-child(2) > a. This approach might be a problem in the future because it will stop working after any minimal change. Besides, it will only capture one of the pagination links, not all of them.
We could capture all the links on the page and then filter them by content. If we were to write a full-site crawler, that would be the right approach. In our case, we only want the pagination links. Using the provided class, .page-numbers a will capture all and then extract the URLs (hrefs) from those. The selector will match all the link nodes with an ancestor containing the class page-numbers.
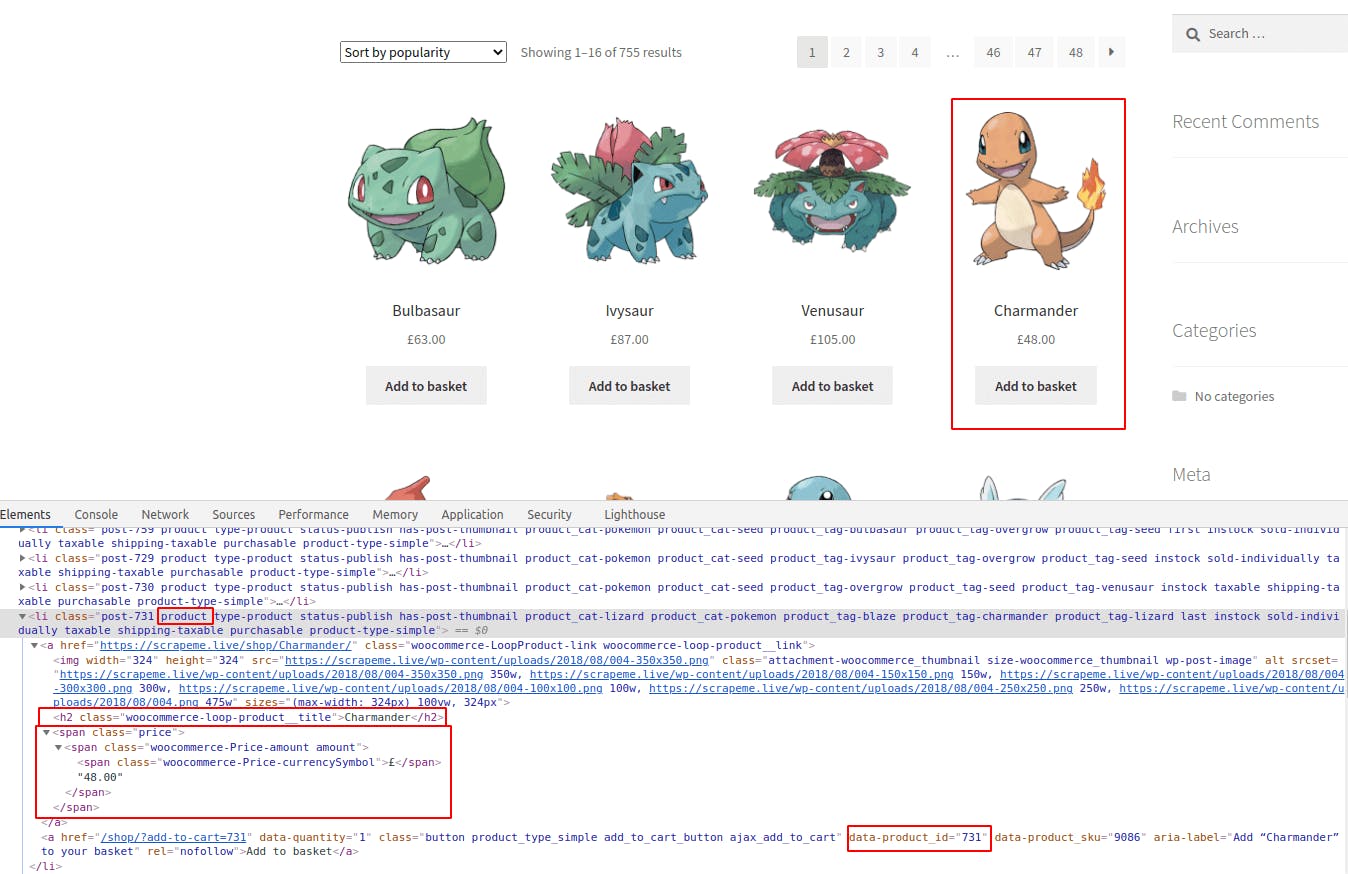
As for the products (Pokémon in this case), we will get id, name, and price. Check the image below for details on selectors, or try again on your own. We will only log the content for now. Check the final code for adding them to an array.

As you can see above, all the products contain the class product, which makes our job easier. And for each of them, the h2 tag and price node hold the content we want. As for the product ID, we need to match an attribute instead of a class or node type. That can be done using the syntax node[attribute="value"]. We are looking only for the node with the attribute, so there is no need to match it to any particular value.
There is no error handling, as you can see above. We will omit it for brevity in the snippets but take it into account in real life. Most of the time, returning the default value (i.e...., empty array) should do the trick.
Following Links
Now that we have some pagination links, we should also visit them. If you run the whole code, you'll see that they appear twice - there are two pagination bars.
We will add two sets to keep track of what we already visited and the newly discovered links. We are using sets instead of arrays to avoid dealing with duplicates, but either one would work. To avoid crawling too much, we'll also include a maximum.
For the next part, we will use async/await to avoid callbacks and nesting. An async function is an alternative to writing promise-based functions as chains. In this case, the Axios call will remain asynchronous. It might take around 1 second per page, but we write the code sequentially, with no need for callbacks.
There is a small gotcha with this: await is only valid in async function. That will force us to wrap the initial code inside a function, concretely in an IIFE (Immediately Invoked Function Expression). The syntax is a bit weird. It creates a function and then calls it immediately.
Avoid Blocks
As said before, we need mechanisms to avoid blocks, captchas, login walls, and several other defensive techniques. It is complicated to prevent them 100% of the time. But we can achieve a high success rate with simple efforts. We will apply two tactics: adding proxies and full-set headers.
There are Free Proxies even though we do not recommend them. They might work for testing but are not reliable. We can use some of those for testing, as we'll see in some examples. Note that these free proxies might not work for you. They are short-time lived.
Paid proxy services, on the other hand, offer IP Rotation. Meaning that our service will work the same, but the target website will see a different IP. In some cases, they rotate for every request or every few minutes. In any case, they are much harder to ban. And when it happens, we'll get a new IP after a short time.
We will use httpbin for testing. It offers several endpoints that will respond with headers, IP addresses, and many more.
The next step would be to check our request headers. The most known one is User-Agent (UA for short), but there are many more. Many software tools have their own, for example, Axios (axios/0.21.1). In general, it is a good practice to send actual headers along with the UA. That means we need a real-world set of headers because not all browsers and versions use the same ones. We include two in the snippet: Chrome 92 and Firefox 90 in a Linux machine.
Headless Browsers
Until now, every page visited was done using axios.get, which can be inadequate in some cases. Say we need Javascript to load and execute or interact in any way with the browser (via mouse or keyboard). While avoiding them would be preferable - for performance reasons -, sometimes there is no other choice. Selenium, Puppeteer, and Playwright are the most used and known libraries. The snippet below shows only the User-Agent, but since it is a real browser, the headers will include the entire set (Accept, Accept-Encoding, etcetera).
This approach comes with its own problem: take a look a the User-Agents. The Chromium one includes "HeadlessChrome," which will tell the target website, well, that it is a headless browser. They might act upon that.
As with Axios, we can provide extra headers, proxies, and many other options to customize every request. An excellent choice to hide our "HeadlessChrome" User-Agent. And since this is a real browser, we can intercept requests, block others (like CSS files or images), take screenshots or videos, and more.
Now we can separate getting the HTML in a couple of functions, one using Playwright and the other Axios. We would then need a way to select which one is appropriate for the case at hand. For now, it is hardcoded. The output, by the way, is the same but quite faster when using Axios.
Using Javascript's Async
We already introduced async/await when crawling several links sequentially. If we were to crawl them in parallel, just by removing the await would be enough, right? Well... not so fast.
The function would call the first crawl and immediately take the following item from the toVisit set. The problem is that the set is empty since the crawling of the first page didn't occur yet. So we added no new links to the list. The function keeps running in the background, but we already exited from the main one.
To do this properly, we need to create a queue that will execute tasks when available. To avoid many requests at the same time, we will limit its concurrency.
If you run the code above, it will print numbers from 0 to 3 almost immediately (with a timestamp) and from 4 to 7 after 2 seconds. It might be the hardest snippet to understand - review it without hurries.
We define queue in lines 1-20. It will return an object with the function enqueue to add a task to the list. Then it checks if we are above the concurrency limit. If we are not, it will sum one to running and enter a loop that gets a task and runs it with the provided params. Until the task list is empty, then subtract one from running. This variable is the one that marks when we can or cannot execute any more tasks, only allowing it below the concurrency limit. In lines 23-28, there are helper functions sleep and printer. Instantiate the queue in line 30 and enqueue items in 32-34 (which will start running 4).
We have to use the queue now instead of a for loop to run several pages concurrently. The code below is partial with the parts that change.
Remember that Node runs in a single thread, so we can take advantage of its event loop but cannot use multiple CPUs/threads. What we've seen works fine because the thread is idle most of the time - network requests do not consume CPU time.
To build this further, we need to use some storage (database) or distributed queue system. Right now, we rely on variables, which are not shared between threads in Node. It is not overly complicated, but we covered enough ground in this blog post.
Final Code
Conclusion
We'd like you to part with four main points:
- Understand the basics of website parsing and crawling.
- Separate responsibilities and use abstractions when necessary.
- Apply the required techniques to avoid blocks.
- Be able to figure out the following steps to scale up.
We can build a custom web scraper using Javascript and Node.js using the pieces we've seen. It might not scale to thousands of websites, but it will run perfectly for a few ones. And moving to distributed crawling is not that far from here.
If you liked it, you might be interested in the Python Web Scraping guide.
Thanks for reading! Did you find the content helpful? Please, spread the word and share it. 👉
Originally published at https://www.zenrows.com
