Mastering Web Scraping in Python: Scaling to Distributed Crawling
Build your own distributed crawler with custom parsers per domain. Discover new pages and store the exact content you need — all in less than 300 LOC.

Web developer who has been working for several startups for more than 10 years, having worked with a wide variety of sectors and technologies. Engineer turned entrepreneur.
Wondering how to build a website crawler and parser at scale? Implement a project to crawl, scrape, extract content, and store it at scale in a distributed and fault-tolerant manner. We will take all the knowledge from previous posts and combine it.
First, we learned about pro techniques to scrape content, although we'll only use CSS selectors today. Then tricks to avoid blocks, from which we will add proxies, headers, and headless browsers. And lastly, we built a parallel crawler, and this blog post begins with that code.
If you do not understand some part or snippet, it might be in an earlier post. Brace yourselves; lengthy snippets are coming.
Prerequisites
For the code to work, you will need Redis and python3 installed. Some systems have it pre-installed. After that, install all the necessary libraries by running pip install.
pip install install requests beautifulsoup4 playwright "celery[redis]"
npx playwright install
Intro to Celery and Redis
Celery "is an open source asynchronous task queue." We created a simple parallel version in the last blog post. Celery takes it a step further by providing an actual distributed queue implementation. We will use it to distribute our load among workers and servers.
Redis "is an open source, in-memory data structure store, used as a database, cache, and message broker." Instead of using arrays and sets to store all the content (in memory), we will use Redis as a database. Moreover, Celery can use Redis as a broker, so we won't need other software to run it.
Simple Celery Task
Our first step will be to create a task in Celery that prints the value received by parameter. Save the snippet in a file called tasks.py and run it. If you run it as a regular python file, only one string will be printed. The console will print two different lines if you run it with celery -A tasks worker.
The difference is in the demo function call. Direct call implies "execute that task," while delay means "enqueue it for a worker to process." Check the docs for more info on calling tasks.
The celery command will not end; we need to kill it by exiting the console (i.e., ctrl + C). We'll need it several times because Celery does not reload after code changes.
Crawling from Task
The next step is to connect a Celery task with the crawling process. This time we will be using a slightly altered version of the helper functions seen in the last post. extract_links will get all the links on the page except the nofollow ones. We will add filtering options later.
We could loop over the retrieved links and enqueue them, but that would end up crawling the same pages repeatedly. We saw the basics to execute tasks, and now we will start splitting into files and keeping track of the pages on Redis.
Redis for Tracking URLs
We already said that relying on memory variables is not an option anymore. We will need to persist all that data: visited pages, the ones being currently crawled, keep a "to visit" list, and store some content later on. For all that, instead of enqueuing directly to Celery, we will use Redis to avoid re-crawling and duplicates. And enqueue URLs only once.
We won't go into further details on Redis, but we will use lists, sets, and hashes.
Take the last snippet and remove the last two lines, the ones calling the task. Create a new file main.py with the following content. We will create a list named crawling:to_visit and push the starting URL. Then we will go into a loop that will query that list for items and block for a minute until an item is ready. When an item is retrieved, we call the crawl function, enqueuing its execution.
It does almost the same as before but allows us to add items to the list, and they will be automatically processed. We could do that easily by looping over links and pushing them all, but it is not a good idea without deduplication and a maximum number of pages. We will keep track of all the queued and visited using sets and exit once their sum exceeds the maximum allowed.
After executing, everything will be in Redis, so running again won't work as expected. We need to clean manually. We can do that by using redis-cli or a GUI like redis-commander. There are commands for deleting keys (i.e., DEL crawling:to_visit) or flushing the database (careful with this one).
Separate Responsabilities
We will start to separate concepts before the project grows. We already have two files: tasks.py and main.py. We will create another two to host crawler-related functions (crawler.py) and database access (repo.py). Please look at the snippet below for the repo file, it is not complete, but you get the idea. There is a GitHub repository with the final content in case you want to check it.
And the crawler file will have the functions for crawling, extracting links, and so on.
Allow Parser Customization
As mentioned above, we need some way to extract and store content and add only a particular subset of links to the queue. We need a new concept for that: default parser (parsers/defaults.py).
And in the repo.py file:
There is nothing new here, but it will allow us to abstract the link and content extraction. Instead of hardcoding it in the crawler, it will be a set of functions passed as parameters. Now we can substitute the calls to these functions by an import (for the moment).
For it to be completely abstracted, we need a generator or factory. We'll create a new file to host it - parserlist.py. To simplify a bit, we allow one custom parser per domain. The demo includes two domains for testing: scrapeme.live and quotes.toscrape.com.
There is nothing done for each domain yet so that we will use the default parser for them.
We can now modify the task with the new per-domain-parsers.
Custom Parser
We will use scrapeme first as an example. Check the repo for the final version and the other custom parser.
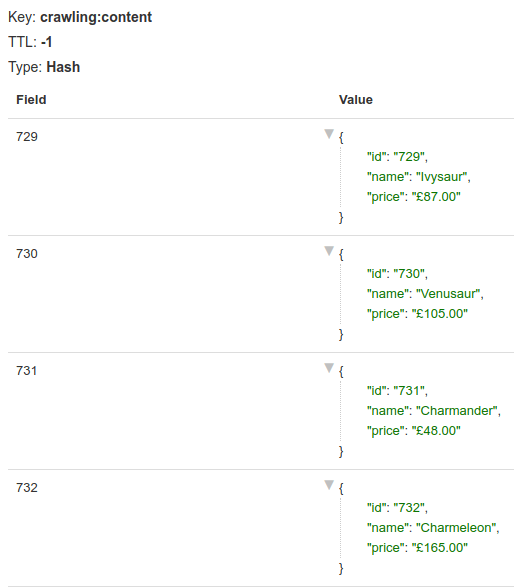
Knowledge of the page and its HTML is required for this part. Take a look at it if you want to get the feeling. To summarize, we will get the product id, name, and price for each item in the product list. Then store that in a set using the id as the key. As for the links allowed, only the ones for pagination will go through the filtering.
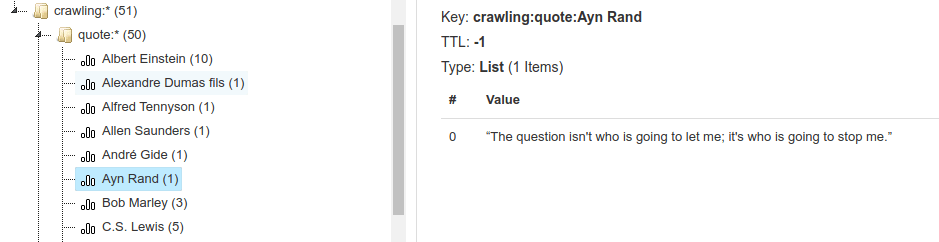
In the quotes site, we need to handle it differently since there is no ID per quote. We will extract the author and quote for each entry in the list. Then, in the store_content function, we'll create a list for each author and add that quote. Redis handles the creation of the lists when necessary.
With the last couple of changes, we have introduced custom parsers that will be easy to extend. When adding a new site, we must create one file per new domain and one line in parserlist.py referencing it. We could go a step further and "auto-discover" them, but no need to complicate it even more.
Get HTML: Headless Browsers
Until now, every page visited was done using requests.get, which can be inadequate in some cases. Say we want to use a different library or headless browser, but just for some cases or domains. Loading a browser is memory-consuming and slow, so we should avoid it when it is not mandatory. The solution? Even more customization. New concept: collector.
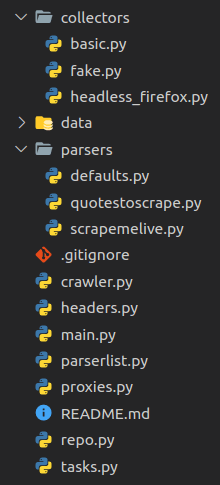
We will create a file named collectors/basic.py and paste the already known get_html function. Then change the defaults to use it by importing it. Next, create a new file, collectors/headless_firefox.py, for the new and shiny method of getting the target HTML. As in the previous post, we will be using playwright. And we will also parametrize headers and proxies in case we want to use them. Spoiler: we will.
If we want to use a headless Firefox for some domain, merely modify the get_html for that parser (i.e., parsers/scrapemelive.py).
As you can see in the final repo, we also have a fake.py collector used in scrapemelive.py. Since we used that website for intense testing, we downloaded all the product pages the first time and stored them in a data folder. We can customize with a headless browser, but we can do the same with a file reader, hence the "fake" name.
Avoid Detection with Headers and Proxies
You guessed it: we want to add custom headers and use proxies. We will start with the headers creating a file headers.py. We won't paste the entire content here, there are three different sets of headers for a Linux machine, and it gets pretty long. Check the repo for the details.
We can import a concrete set of headers or call the random_headers to get one of the available options. We will see a usage example in a moment.
The same applies to the proxies: create a new file, proxies.py. It will contain a list of them grouped by the provider. In our example, we will include only free proxies. Add your paid ones in the proxies dictionary and change the default type to the one you prefer. If we were to complicate things, we could add a retry with a different provider in case of failure.
Note that these free proxies might not work for you. They are short-time lived.
And the usage in a parser:
Bringing it All Together
It's been a long and eventful trip. It is time to put an end to it by completing the puzzle. We hope you understood the whole process and all the challenges that scraping and crawling at scale have.
We cannot show here the final code, so take a look at the repository and do not hesitate to comment or contact us with any doubt.
The two entry points are tasks.py for Celery and main.py to start queueing URLs. From there, we begin storing URLs in Redis to keep track and start crawling the first URL. A custom or the default parser will get the HTML, extract and filter links, and generate and store the appropriate content. We add those links to a list and start the process again. Thanks to Celery, once there is more than one link in the queue, the parallel/distributed process starts.
Points Still Missing
We already covered a lot of ground, but there is always a step more. Here are a few functionalities that we did not include. Also, note that most of the code does not contain error handling or retries for brevity's sake.
Distributed
We didn't include it, but Celery offers it out-of-the-box. For local testing, we can start two different workers celery -A tasks worker --concurrency=20 -n worker1 and ... -n worker2. The way to go is to do the same in other machines as long as they can connect to the broker (Redis in our case). We could even add or remove workers and servers on the fly, no need to restart the rest. Celery handles the workers and distributes the load.
It is important to note that the worker's name is essential, especially when starting several in the same machine. If we execute the above command twice without changing the worker's name, Celery won't recognize them correctly. Thus launch the second one as -n worker2.
Rate Limit
Celery does not allow a rate limit per task and parameter (in our case, domain). Meaning that we can throttle workers or queues, but not to a fine-grained detail as we would like to. There are several issues open and workarounds. From reading several of those, the take-away is that we cannot do it without keeping track of the requests ourselves.
We could easily rate-limit to 30 requests per minute for each task with the provided param @app.task(rate_limit="30/m"). But remember that it would affect the task, not the crawled domain.
Robots.txt
Along with the allow_url_filter part, we should also add a robots.txt checker. For that, the robotparser library can take a URL and tell us if it is allowed to crawl it. We can add it to the default or as a standalone function, and then each scraper decides whether to use it. We thought it was complex enough and did not implement this functionality.
If you were to do it, consider the last time the file was accessed with mtime() and reread it from time to time. And also, cache it to avoid requesting it for every single URL.
Conclusion
Building a custom crawler/parser at scale is not an easy nor straightforward task. We provided some guidance and tips, hopefully helping you all with your day-to-day tasks.
Before developing something as big as this project at scale, think about some important take-aways:
- Separate responsabilities.
- Use abstractions when necessary, but do not over-engineer.
- Don't be afraid of using specialized software instead of building everything.
- Think about scaling even if you don't need it now; just keep it in mind.
Thanks for joining us until the end. It's been a fun series to write, and we hope it's also been attractive from your side. If you liked it, you might be interested in the Javascript Web Scraping guide.
Do not forget to take a look at the rest of the posts in this series.
- Crawling from Scratch (3/4)
- Avoid Blocking Like a Ninja (2/4)
- Mastering Extraction (1/4)
Did you find the content helpful? Please, spread the word and share it. 👉
Originally published at https://www.zenrows.com


